Wednesday, 25 April 2012


Whole Digipack with front designs
I applied the designs I had dne for the front for the digipack on the rest of the didipack to see how they would look:


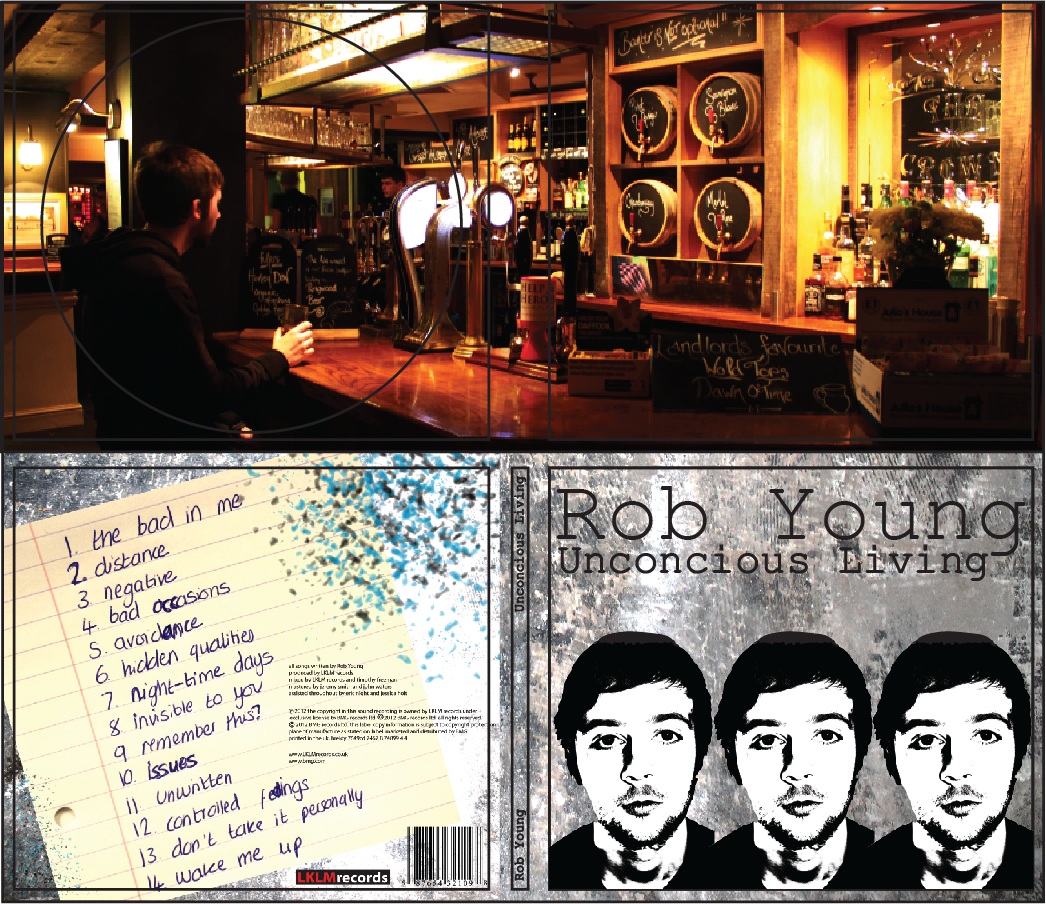


Front of Digipack
From looking through the different designs for the front covers of alternative rock digipacks, I got the idea to use the threshold effect to make the photo black and white. I thought this may give the image a 'dirty' appearance.


I liked these a lot and wanted to incorporate them into the from cover of my digipack. However, I was unsure of how to do it without making it look amateur. Therefore, I tried a few designs to see what looked best.


 Above are all possible designs for the front of my digipack. I designed them like this because I am sticking with the alternative rock genre. From looking at them like this and comparing them, I prefer the one with only three images of Chris. I am yet to add the artist and album name, however I decided to design some covers with bigger images or Chris so there are less of them.


Above are the designs I came up with after deciding that I preferred less and larger images of Chris. However audience feedback told me that something else added would improve them, therefore I did something different:


 See no evil, hear no evil and speak no evil is something very iconic and reasonably well known. Relating to the alternative rock genre, this is different and something out of the ordinary which I think works very well. I included the blue with attempts to match it to the back cover of my digipack. I am yet to see how these designs look with the rest of my digipack!


I liked these a lot and wanted to incorporate them into the from cover of my digipack. However, I was unsure of how to do it without making it look amateur. Therefore, I tried a few designs to see what looked best.


Monday, 23 April 2012
Digipack Inside Panels
I decided that a photo from the actual filming locations would be an effective touch to add to the inside of my digipack. As I was filming, I took random photos for proof of filming and to help me capture different angles for my filming. This has come in very useful as I can now use these for my digipack.
I had a fair few to choose from including these:


I had a fair few to choose from including these:


All of these photos are taken from in the pub. I think this is the perfect location for the photos as the lighting is low key and the message that the photo delivers consists of the character being lonely or depressed as he is drinking on his own at night time.
I like the photos of Chris drinking at the bar the most. They show that he is on his own and the lighting is very good here. I also think the angle is nice as the photos show the bar as well.
Above are the photos that I think are most relevant and efective. However, whichever one I choose will need to be editited. From looking at these photos, I have decided that I like the one of Chris where he isn't drinking. I think it gives the impression that he is stuck in thought rather than just drinking at the bar.
To make this photo more effective, I chose to alter the contrast and exposure levels to make the lighting seem more dark with attempts to make the photo seem more emotional.

This is the finished photo for the inside panels of my digipack. The editing I have done on it makes it look more effective and professional.
This is what my digipack looks like so far with all of the panels except from the front.

Monday, 16 April 2012
Editing
After capturing all of the footage I needed to make my music video, I then transferred it all onto the W Drive on one of the computers in the media room. I then opened my footage up on Adobe Premier Pro in order to begin the editing. I initially had no plan on how I would structure my editing, but then decided I would edit it from beginning to end. This worked out really well for me as I was able to adjust the times of the clips freely without having too much stress of trying to fit clips in here and there. I knew exactly what shots I had and had a fair idea on where they would all go before I even started my editing which was a huge benefit as I knew exactly what shots should go where.
It took me a fair amount of time to cut the clips up into the right time scales and edit them all together to fit the time of the song. Once everything fitted together, I then had to change the lighting, contrast and exposure levels of some of the clips so they matched the other ones. This was due to the fact that the lighting was different in many clips due to me filming the shots on different days. It was near impossible to get the exact same lighting and therefore the editing software helped me to achieve this.
I also used the editing software to extend the duration of the clips so they filled up a larger area of the song. I used this on clips such as the ones of Georgie in the bed as Chris was at the pub. Another feature I used was the 'Ghosting Effect' when Chris was spinning and singing up into the camera. I used this in order to portray a drunk effect as though his vision is blurred and as though he is in a slightly outer body experience.
I created the title on Adobe Illustrator and opened it up into the title option on Premier Pro and chose how I wanted it to appear on the screen and how I wanted it to exit. I chose to have the title appear on the screen slightly after the beginning of the song as this is how they seem to appear in real media products. I chose my music video to be played on 'Scuzz' as it fits the genre of music that is played on this station and also relates to the other tracks that appear here.
Problems Encountered:
It took me a fair amount of time to get round to editing my music video due to the change of actor initially. However, when I was finally able to start editing, there were problems with rendering and it was taking up to 40 minutes some days for all of the clips to render. Moreover, it was eventually sorted and I was able to get my editing done on time and was not rushed into a lower standard of work .
Another problem I had was the fact that I could not get one certain clip to the right lighting. I altered all different levels of contrast and exposure etc to try and get the clip to the right levels, however my bedroom lighting that I had filmed in did me no favors and it proved near impossible to get it right. I eventually settled for the nearest lighting to best and agreed that it did fit in and was not too visible or tatty. I had audience feedback about this to settle my opinion as looking at it for a long amount of time proved that I could not find a solution. However, my peers disagreed and assured me that what I had done fitted nicely.
One other thing I recognized when editing was the occasional shakey camera when filming. I didn't think it affected my video too much and later thought it actually fitted in. I then took this up with my peers and Emma in my class said that "The shakey camera shots actually fit in quite nicely with the genre of the music video and also with the narrative. The narrative is about a drunk man who obviously has problems in his life and the shakey shots kind of help to represent that".
Thursday, 29 March 2012
Second day of filming!
The second day of filming involved capturing everything I was unable to get on the first day. This included most of the lip synching as the weather was a lot better and more bareable. It went really well with no problems and I was able to just get on and film what I needed to. We re-visited the pub where we went on the first day of filming and purchased another beverage for Chris to drink. I filmed him drinking his alcohol at the bar on his own to create the lonesome effect as though he has no one. The pub was a really good place for this, they did not mind me filming in there even at peak time which was a bonus. I was able to capture shots of Chris on his own as though there were no other people at the pub to create the effect that it was late at night and that he had gone to the pub purely to drink to try to make himself feel better due to not being able to sleep.
The second day of filming did not take long at all because I had planned out exactly what I needed to capture and exactly the locations we would use. We didn't come across anyone that got in the way of the shots and the odd passer by and cars going past created a natural effect which worked quite well.
Seeing as the second day of filming was so successful, it was not necessary for me to have a third day of filming which meant I could transfer all of my footage onto Adobe Permier Pro in order to start editing my music video together.
Subscribe to:
Posts (Atom)